Announcement

Collapse
No announcement yet.

Kromrey Disclosure - Bedini SG - Beyond the Advanced Handbook by Peter Lindemann

Collapse
X
 
  • Filter
  • Time
  • Show
Clear All
new posts

  • Something like that, if a highly cycled SSG charged battery is let stand for 1-4 hours after charging and have 13V + then don't discharge them so deep, and they will bounce back up much easier the next charge cycle. And still have a good output.

    So think about it, a normal charged battery will stand at 12.7V +/- and discharge down to 12 = x Ah

    I have seen highly cycled L16's stand at 13.10+, (in 24V Banks) and not discharge below 13V for 30 min or so, and take over 3 hours to go below 12.90V and the another 8 Hours or so to get down to the 12.4V I was stopping at, and still have the same Ah or more than a normal charged battery.

    It makes the battery operate in a different Voltage range, and different state of Sulfanation, closer to the non supfhanation range of the charged battery, than the highly Sulfanated state of a battery that has been discharged down to 12V -.

    Every discharge cycle of a normal charge battery creates a layer of sulfate on the plates, a charge cycle should get rid of ALL of that layer, but normal chargers cant do that and get them up over 15V+, where the spikes in the SSG works different and can get them up to 16V + if allowed to.....

    Some times it takes a Lot of cycles to brake through all the layers of Sulfanation that have built up, and is why new battery's are better to start with, as less sulfate layers to dissolve back into the electrolyte to get a fully charged battery......

    See PL's Battery Presentation from 2011 for more info on the Charge / Discharge state chemistry of the battery and the 2 different plate compounds / electrolyte, and how it changes when charged and discharged.....
    Last edited by RS_; 07-09-2018, 07:33 PM.

    Comment


    • Originally posted by RS_ View Post
      Something like that, if a highly cycled SSG charged battery is let stand for 1-4 hours after charging and have 13V + then don't discharge them so deep, and they will bounce back up much easier the next charge cycle. And still have a good output.

      So think about it, a normal charged battery will stand at 12.7V +/- and discharge down to 12 = x Ah

      I have seen highly cycled L16's stand at 13.10+, (in 24V Banks) and not discharge below 13V for 30 min or so, and take over 3 hours to go below 12.90V and the another 8 Hours or so to get down to the 12.4V I was stopping at, and still have the same Ah or more than a normal charged battery.

      It makes the battery operate in a different Voltage range, and different state of Sulfanation, closer to the non supfhanation range of the charged battery, than the highly Sulfanated state of a battery that has been discharged down to 12V -.

      Every discharge cycle of a normal charge battery creates a layer of sulfate on the plates, a charge cycle should get rid of ALL of that layer, but normal chargers cant do that and get them up over 15V+, where the spikes in the SSG works different and can get them up to 16V + if allowed to.....

      Some times it takes a Lot of cycles to brake through all the layers of Sulfanation that have built up, and is why new battery's are better to start with, as less sulfate layers to dissolve back into the electrolyte to get a fully charged battery......

      See PL's Battery Presentation from 2011 for more info on the Charge / Discharge state chemistry of the battery and the 2 different plate compounds / electrolyte, and how it changes when charged and discharged.....
      Hi RS,
      Cheers for that little briefings! can we not express the battery in terms of its 'Q''-factor like how we do that for Inductor or Capacitor. this expression is a ratio of the Energy stored per cycle to that dissipated per cycles?. In our case here Charge -Discharge cycles.
      would the COP expression be same as this??
      Rgds,
      Faraday88.
      'Wisdom comes from living out of the knowledge.'

      Comment


      • Originally posted by RS_ View Post
        Something like that, if a highly cycled SSG charged battery is let stand for 1-4 hours after charging and have 13V + then don't discharge them so deep, and they will bounce back up much easier the next charge cycle. And still have a good output.

        So think about it, a normal charged battery will stand at 12.7V +/- and discharge down to 12 = x Ah

        I have seen highly cycled L16's stand at 13.10+, (in 24V Banks) and not discharge below 13V for 30 min or so, and take over 3 hours to go below 12.90V and the another 8 Hours or so to get down to the 12.4V I was stopping at, and still have the same Ah or more than a normal charged battery.

        It makes the battery operate in a different Voltage range, and different state of Sulfanation, closer to the non supfhanation range of the charged battery, than the highly Sulfanated state of a battery that has been discharged down to 12V -.

        ..
        I agree with RS's statements with regard to the batteries altering their charge and discharge characteristics. After numerous cycles the battery appears to become addicted to the SSG's charging magic and the maximum charge voltage keeps rising up to 16 volts. Some experimenters are unaware of this fact and stop charging at 15.3v or so, thereby losing the extra kick and desulfation provided by the higher voltage threshold - net result is that the battery appears to lose Ah capacity. This leads to the erroneous assumption that this charging process is killing the battery!

        RS is also spot on with the discharge voltage threshold of 12.3-12.4 volts. Much of this depends on the battery type used...

        Bear in mind that these observations and results are based on hundreds of individual SSG tests that were performed by me several years ago. A number of batteries were toasted by this experimenter's ignorance.

        Yaro
        Yaro

        "The Universe is under no obligation to make sense to you." -Neil Degrasse Tyson

        Comment


        • Originally posted by Yaro1776 View Post
          I agree with RS's statements with regard to the batteries altering their charge and discharge characteristics. After numerous cycles the battery appears to become addicted to the SSG's charging magic and the maximum charge voltage keeps rising up to 16 volts. Some experimenters are unaware of this fact and stop charging at 15.3v or so, thereby losing the extra kick and desulfation provided by the higher voltage threshold - net result is that the battery appears to lose Ah capacity. This leads to the erroneous assumption that this charging process is killing the battery!

          RS is also spot on with the discharge voltage threshold of 12.3-12.4 volts. Much of this depends on the battery type used...

          Bear in mind that these observations and results are based on hundreds of individual SSG tests that were performed by me several years ago. A number of batteries were toasted by this experimenter's ignorance.

          Yaro
          Hi Yaro,
          Perfect !!! AGMs were refilled and SSG revived... unfortunately some of the cells were gone (shorted), so it revived only the good ones, Yes 16V plus..
          Rgds,
          BTW your signature is superb!
          Faraday88.
          'Wisdom comes from living out of the knowledge.'

          Comment


          • I'm back,

            One thing I want to make note of is why my system stopped before all by itself is because of the cheap analog ammeter that I was using..

            Good thing that I bought 2 of them and to find better ammeters for future experiments.

            I just finished charging my first deep cycle battery to 15.2v last night late and then let it rest. 20hrs later it sits at 13.40v which I recall when doing experiments with bike wheel and 7AH batteries back in 2013. And yes, I have charged the batteries then to 16v+ because I was delayed at stopping the charge and they still worked fine with more cycles. I did not know about stopping at approximately 12.4v discharging then as I do now with the 105AH batteries I am using now. Took about two days to get where I am now with only one coil but the system happily cruzed at 820 rpm's. Now to do the C20 discharge rate while I finish building the second half of the 8 transistor kit and add the second genny coil to my system. This should show a faster charge rate I hope and will see when I go to charge battery again this weekend while I can watch what is going on. Yes, automate everything.

            Thanks RS and other members for your help and just keep it coming.

            I will not start another run until I finish building the second half of 8 transistor ckt and take it from there.

            Comment


            • Originally posted by Yaro1776 View Post
              I agree with RS's statements with regard to the batteries altering their charge and discharge characteristics. After numerous cycles the battery appears to become addicted to the SSG's charging magic and the maximum charge voltage keeps rising up to 16 volts. Some experimenters are unaware of this fact and stop charging at 15.3v or so, thereby losing the extra kick and desulfation provided by the higher voltage threshold - net result is that the battery appears to lose Ah capacity. This leads to the erroneous assumption that this charging process is killing the battery!

              RS is also spot on with the discharge voltage threshold of 12.3-12.4 volts. Much of this depends on the battery type used...

              Bear in mind that these observations and results are based on hundreds of individual SSG tests that were performed by me several years ago. A number of batteries were toasted by this experimenter's ignorance.

              Yaro
              I agree with both of you. Charge and discharge according to the charge/discharge curves - not what the volt meter is telling you.

              John K.

              Comment


              • Enjoyed reading about charge/discharge and will keep in mind. Added second coil and started second run after discharging the charge battery to around 12.3v. After adjusting the coil-to-rotor distance for second coil like the first coil, system happily runs at 910 rpm's at 1.5 amps. I adjusted the 1K pot for input draw of 2 amps to help get more Radiant energy for charging. I noticed a charging difference depending on setting of pot and can see it on the o'scope because the Spike gets smaller as you tune for max speed meaning higher resistance. My little digital o'scope with 1GS/s shows the amplitude of the Spike just like the analog HP 275Mhz o'scope I just received, so I can depend on my little digital o'scope to get an idea of what is going on.

                I connected the second coil like the first coil as a drive coil with the fifth wire as a trigger. I had to try this since I know RS mentioned other variations so I have to see what happens for my notebook and I still do not know what "back popping" the primary is and need to see a schematic to show how and why? Unless it refers to something in SG3 book which I have not gone back to yet to check need more time.

                Being curious, I posted early on about the 1N4000 thru 1N4007 family of diodes are the same thing except for their voltages and curious about the 1N5408 diode and see that it is the equivalent to the 1N4007 except for one major parameter, Peak Forward Surge Current is 200A where as the 1N4000 line of diodes is only 30A, no matter which voltage diode is used!!! I have in the past played with 1N914 and 1N4148 diodes for the base diode and noticed no difference as an experiment with my bike wheel version back in 2013 because it worked!!

                The bike wheel just kept going as it is now, but different wheels are being used to continue on with project. Hope pic works this time...Click image for larger version

Name:	P7150012.jpg
Views:	1
Size:	1,004.1 KB
ID:	49928

                Comment


                • Originally posted by rdvideo View Post
                  Enjoyed reading about charge/discharge and will keep in mind. Added second coil and started second run after discharging the charge battery to around 12.3v. After adjusting the coil-to-rotor distance for second coil like the first coil, system happily runs at 910 rpm's at 1.5 amps. I adjusted the 1K pot for input draw of 2 amps to help get more Radiant energy for charging. I noticed a charging difference depending on setting of pot and can see it on the o'scope because the Spike gets smaller as you tune for max speed meaning higher resistance. My little digital o'scope with 1GS/s shows the amplitude of the Spike just like the analog HP 275Mhz o'scope I just received, so I can depend on my little digital o'scope to get an idea of what is going on.

                  I connected the second coil like the first coil as a drive coil with the fifth wire as a trigger. I had to try this since I know RS mentioned other variations so I have to see what happens for my notebook and I still do not know what "back popping" the primary is and need to see a schematic to show how and why? Unless it refers to something in SG3 book which I have not gone back to yet to check need more time.

                  Being curious, I posted early on about the 1N4000 thru 1N4007 family of diodes are the same thing except for their voltages and curious about the 1N5408 diode and see that it is the equivalent to the 1N4007 except for one major parameter, Peak Forward Surge Current is 200A where as the 1N4000 line of diodes is only 30A, no matter which voltage diode is used!!! I have in the past played with 1N914 and 1N4148 diodes for the base diode and noticed no difference as an experiment with my bike wheel version back in 2013 because it worked!!

                  The bike wheel just kept going as it is now, but different wheels are being used to continue on with project. Hope pic works this time...[ATTACH=CONFIG]6995[/ATTACH]
                  Hi rdvideo,
                  Admire your hard work!! great job man!! just few pointers... always remember the Machine is a High-Frequency operated so every wire length is an Inductance and every alignment/orientation is Capacitive so be watchful on how close you make it look similar to PL & JB machine. the copper tubing used for the junction for all the strands of each coil is vital, so why not have it there?
                  Rgds,
                  Faraday88.
                  Last edited by Faraday88; 07-17-2018, 05:06 AM.
                  'Wisdom comes from living out of the knowledge.'

                  Comment


                  • Hi JK,

                    Plz explain Charge Curves, Discharge Curves for these PPL........

                    Comment


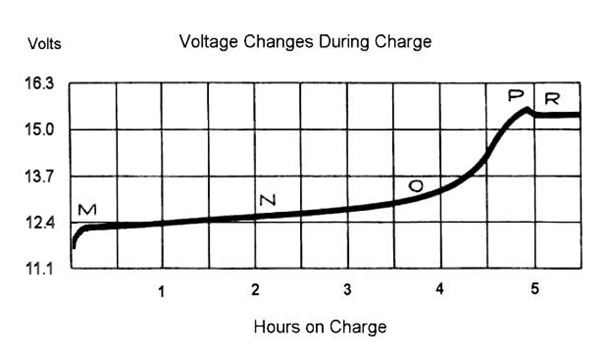
                    • Charge/Discharge Curves

                      This relates to "deep cycle" flooded lead acid batteries - at least until you understand the process. I'd suggest that if after you follow the guide below your battery charge/discharge curve doesn't look like these, there is something wrong with either your battery or charger. Now, if you don't have the equipment that will chart for you, you can take a not of the battery voltage every 20 minutes or so and plug the Volts and Hours into a chart manually or Excel or similar..

                      Firstly, the charge curve.

                      Don't take too much notice of the "Volts" or "Hours on Charge" - it will be different depending on your charger and your battery and what condition it's in. What's important in this image is the M, N, O, P and R stages.


                      You want to continue to charge your battery past the "P" stage, as this is where most of the de-sulphation occurs. You'll know when to stop charging when the "P" stage is completed and you're in the "R" stage. I usually go for no more than about 20 minutes in the "R" stage. Anything more is a waste of time and energy and is not good for the battery.

                      See that little dip in voltage when you go from "P" to "R"? That's the impedance dropping in the battery, which is also a good indication that the battery is fully charged and also fully de-sulphated. However, in my experience that drop is only visible for a very healthy battery. Usually the curve will flatten out at the "P" to "R" stage. Don't wait forever for it to drop or as an indication the battery hasn't completed charging yet.

                      One piece of advice - if your battery is taking longer than 24 hours to reach the "R" stage your charger isn't powerful enough (or battery too large) and you won't see the capacity gains you should expect from a Bedini SG. Conversely, if your'e reaching the "R" stage in under about 12 hours you're charger is to too powerful (or battery too small).

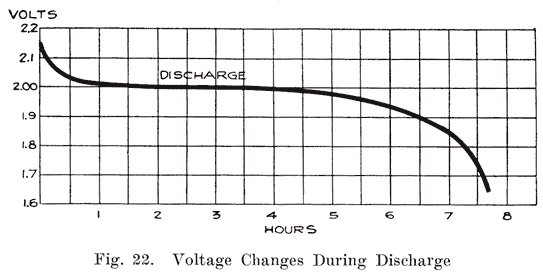
                      Discharge curve -


                      Again, the "Volts" and "Hours" are subjective depending on the condition of your battery and the discharge rate. (The above chart is showing voltage/cell) The first thing to note is what the "Discharge Termination Point" should be. On a healthy battery I go as low as where the line on the charge starts dropping off quickly - this would be somewhere around the "1.9V" & "6.5" hours points on the chart. For a battery I am restoring, the Discharge Termination Point would be around the "1.95V" mark on the chart. I'll stress again that don't go by the voltage or hours, go by where the battery is on the discharge curve.
                      As for the discharge rate, for a healthy battery (by healthy I mean at least 80% of the Ah rating at the C20 rate) I would not discharge any more than C10 or you'll be killing the battery. Anything up to C50 is OK, or even C100 periodically is fine.
                      More importantly is to re-charge the battery as soon as possible after discharging. Think of it as every day you leave the battery discharged is another charge/discharge cycle you'll need to do to repair the damage - which done properly will take 2 days. So if you let a battery sit discharged for a month, it will take 2 months to restore it. If you're not going to use it, it's better to re-charge it straight away and top it off every 1-2 weeks to keep it healthy.

                      John K.

                      Comment


                      • Originally posted by John_Koorn View Post
                        This relates to "deep cycle" flooded lead acid batteries - at least until you understand the process. I'd suggest that if after you follow the guide below your battery charge/discharge curve doesn't look like these, there is something wrong with either your battery or charger. Now, if you don't have the equipment that will chart for you, you can take a not of the battery voltage every 20 minutes or so and plug the Volts and Hours into a chart manually or Excel or similar..

                        Firstly, the charge curve.

                        Don't take too much notice of the "Volts" or "Hours on Charge" - it will be different depending on your charger and your battery and what condition it's in. What's important in this image is the M, N, O, P and R stages.


                        You want to continue to charge your battery past the "P" stage, as this is where most of the de-sulphation occurs. You'll know when to stop charging when the "P" stage is completed and you're in the "R" stage. I usually go for no more than about 20 minutes in the "R" stage. Anything more is a waste of time and energy and is not good for the battery.

                        See that little dip in voltage when you go from "P" to "R"? That's the impedance dropping in the battery, which is also a good indication that the battery is fully charged and also fully de-sulphated. However, in my experience that drop is only visible for a very healthy battery. Usually the curve will flatten out at the "P" to "R" stage. Don't wait forever for it to drop or as an indication the battery hasn't completed charging yet.

                        One piece of advice - if your battery is taking longer than 24 hours to reach the "R" stage your charger isn't powerful enough (or battery too large) and you won't see the capacity gains you should expect from a Bedini SG. Conversely, if your'e reaching the "R" stage in under about 12 hours you're charger is to too powerful (or battery too small).

                        Discharge curve -


                        Again, the "Volts" and "Hours" are subjective depending on the condition of your battery and the discharge rate. (The above chart is showing voltage/cell) The first thing to note is what the "Discharge Termination Point" should be. On a healthy battery I go as low as where the line on the charge starts dropping off quickly - this would be somewhere around the "1.9V" & "6.5" hours points on the chart. For a battery I am restoring, the Discharge Termination Point would be around the "1.95V" mark on the chart. I'll stress again that don't go by the voltage or hours, go by where the battery is on the discharge curve.
                        As for the discharge rate, for a healthy battery (by healthy I mean at least 80% of the Ah rating at the C20 rate) I would not discharge any more than C10 or you'll be killing the battery. Anything up to C50 is OK, or even C100 periodically is fine.
                        More importantly is to re-charge the battery as soon as possible after discharging. Think of it as every day you leave the battery discharged is another charge/discharge cycle you'll need to do to repair the damage - which done properly will take 2 days. So if you let a battery sit discharged for a month, it will take 2 months to restore it. If you're not going to use it, it's better to re-charge it straight away and top it off every 1-2 weeks to keep it healthy.

                        John K.
                        Thanks JK, that was a very good review and is similar to what the SG books: tells us
                        just a question though, why is the discharge curve explained only for a single cell (2.2 v )? any thing in specific?
                        Best Regards,
                        Faraday88.
                        'Wisdom comes from living out of the knowledge.'

                        Comment


                        • Originally posted by Faraday88 View Post
                          Thanks JK, that was a very good review and is similar to what the SG books: tells us
                          just a question though, why is the discharge curve explained only for a single cell (2.2 v )? any thing in specific?
                          Best Regards,
                          Faraday88.
                          Faraday, that's the best image Google gave me. Multiply it by number of cells for your battery

                          John K.

                          Comment


                          • Thanks JK,

                            That was a great explanation.......!

                            Comment


                            • Originally posted by John_Koorn View Post
                              Faraday, that's the best image Google gave me. Multiply it by number of cells for your battery

                              John K.
                              Ok JK well taken...
                              Rgds,
                              Faraday88.
                              'Wisdom comes from living out of the knowledge.'

                              Comment


                              • Thanks for the explanation JK. I had all of this info back in 2013 when I was using my bike wheel version with a bi-filar I made using 7AH batteries and recorded everything the best I could and submitted the info back then to the forum but nothing happened. Then the HD on the computer I was using at the time died and lost all info and I was using an Excel doc to record everything too at the time.

                                Right now I need to get my machine assembled properly and redo the wiring since it is a rat's nest to shorten wire runs. Faraday88 mentioned about copper tubing to use to connect the common wires from each coil, but I do not know what to use. I've seen some pics and no info about it. What copper tubing and have to find something to attach it to the frame? I had planned to mount the ckt boards on the back of the frame and put batteries in back of the frame to help keep wires short as possible. I was just in a hurry to see the system run with what I have since I had to wait a long time for items.

                                The primary batteries and the charge battery are charged and sitting in the 13v+ range until I update my setup to start again.

                                Question, how does all of this charging stuff relate to using JB's Linear Amplifier Regulator to charge a battery?

                                Comment

                                Working...
                                X